Using AutoText to Insert Boilerplate Text into a Document
Provided by Molly Pell, Senior Systems Analyst
Often, documents require boilerplate text and/or images, such as disclaimers, license terms, signature lines, etc. For years, I was guilty of one of the worst Word offenses: I would find the last document I worked on, copy the text I needed, and paste it into the new document. Not only is this inefficient, but it is also downright dangerous, as people in a hurry may forget to replace document-specific text (such as a recipient name) when copying into a new document.
A better way is to create AutoText entries for such standard boilerplate text.
Word comes with a list of standard AutoText entries (reference lines, salutations, etc.). Additionally, you can add your own entries by following these steps:
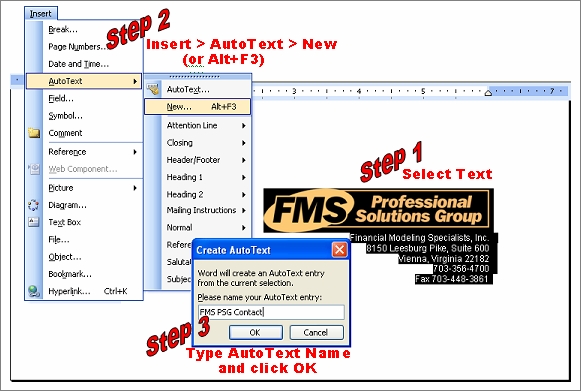
- Highlight the text that you want to add as an entry, including paragraph marks. Make sure that the text does not contain document-specific text. It can, however, contain pictures and field references.
- From the Word menu select Insert > AutoText > New (or use Alt+F3 as a shortcut).
- When the Create AutoText form appears, type the name that you
want to use for the AutoText entry, and click OK. Make sure that the
name is more than four characters if you want Word to show AutoComplete
suggestions (see below).
There are several options for inserting AutoText. Below are the three methods that I find easiest:
- AutoComplete Suggestions: Simply start typing the AutoText Entry’s name. After
four characters, Word pops up its suggestion—press Enter or F3 to insert the AutoText:
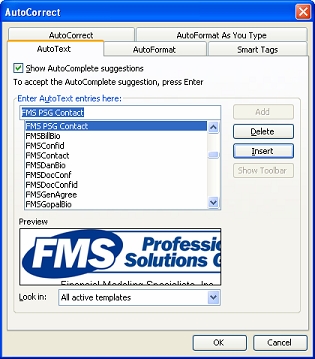
If AutoComplete suggestions don’t show, select Insert > AutoText > AutoText, and make sure “Show AutoComplete Suggestions” is checked.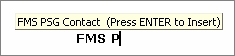
- Insert AutoText: From the Word menu, select Insert > AutoText > AutoText.
Locate your entry in the list, and click Insert:
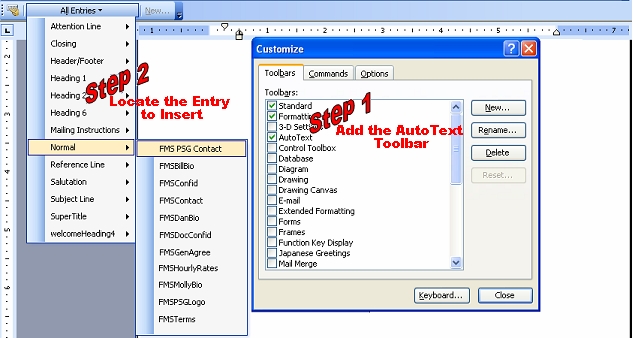
- AutoText Toolbar: Show the AutoText toolbar by opening Tools > Customize, and
turning on the AutoText toolbar. When you want to add an entry, drop
down “All Entries”, and locate the desired item. Your entries are
categorized by the style of the first paragraph in the AutoText
(generally Normal).
When creating and using AutoText, you should be aware of the following:
- Once created, you cannot edit AutoText entries. Instead, replace the existing entry by following the steps in “Creating AutoText Entries” above. Give the new entry the same name as the original one, and the old one is overwritten.
- To rename AutoText entries, open Tools > Templates and Add-Ins. Click Organizer, and use the Rename option on the AutoText tab.
- AutoText entries are saved with your document template. You can copy entries to another template using Tools > Templates and Add-Ins. Click Organizer, and use the options on the AutoText tab to copy the entries.
- AutoText is not a replacement for document templates. If several documents use the same structure, style, or layout, create and use document templates.
- This article contains more helpful information and tips for the AutoCorrect feature: What is AutoText and How Do I Use It?
Connect with Us
 Email Newsletter
 Developer Team Blog
 Facebook
 X/Twitter
Additional Resources
 My FMS
Thank you! Thank you! I just finished reading this document, which was part of a link in the recent Buzz newsletter. I have printed it for others to read, especially those skeptical on the powers of Access and its capabilities.
Darren D.
 All Our Microsoft Access Products


